APEXVIEW APX100桌面荧光显微镜的图像拼接功能的改进
引言
APEXVIEW APX100桌面荧光显微镜用于观察细胞和组织样品。特别是对于组织样品,这款显微镜可以搜索样品的整体结构,以寻找比显微镜视场更宽的感兴趣区域。
能够将视场的多幅图像拼接在一起,以获得大区域、高分辨率的图像,是观察组织样品的一项重要功能。以下三点对于图像拼接至关重要。
1. 拼接准确度
拼接图像是通过为每个视场移动电动XY载物台而构建的。
但是,由于XY载物台存在一些对位不准的情况,如果仅根据每个视场的XY坐标来确定拼接位置,那么在拼接时,每个视场的拼接图像会发生偏移。因此,要采用图像处理方式,通过在图像内部搜索来确定拼接位置。在图像拼接过程中有必要避免出现任何偏差,因为偏差会影响后续的图像分析。
2. 拼接图像质量
在视场外围,光学因素会以各种方式影响图像质量。在获取拼接图像时,必须避免图像质量的下降。
3. 拼接量
拼接图像要求很高的准确性和图像质量,因此需要时间来捕捉创建拼接图像所需的每个视场的图像。采集了图像后,处理拼接图像需要更长的时间,这会阻碍实验工作流程。拼接图像的采集需要兼顾图像质量和拼接量,以有效地获取实验数据。
改进APX100显微镜的图像拼接功能
获取拼接图像是APX100显微镜的主要应用之一。
为此,我们通过升级软件提高了拼接图像的质量。同时,我们还利用APX100显微镜进一步提高了实验效率。
cellSens APEX软件是APX100显微镜的控制软件,其4.3.1版本对图像拼接功能进行了三项重要改进。
1. 提高了拼接准确性
拼接算法的改进
视场中相邻图像的拼接是通过图像处理来完成的。在上一个版本之前,图像是在每个单一视场之后立即拼接的,这种方法被称为顺序拼接。
在顺序拼接方法中,当相邻视场图像的拼接部分只是一个没有样品的背景区域时,拼接区域仅包含少量信息。这会导致拼接错位。
在cellSens APEX软件版本4.3.1中,我们改进了配准功能。现在,拼接算法会保留一定视场范围的图像,直到获得上佳位置,然后再在保留的视场范围内找到上佳位置(图1)。
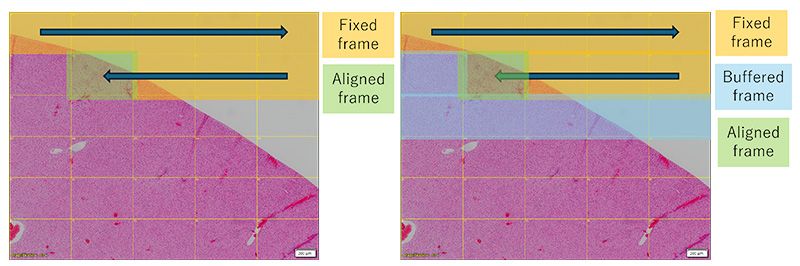
图1. 之前的拼接算法(左图)和cellSens APEX软件版本4.3.1中更新的拼接算法(右图)。固定帧:定位帧。缓冲帧:定位前保留的帧。对齐帧:用于优化定位的帧。
在顺序拼接法中,只有已经定位的帧才能用于对齐。在保留一定视场范围图像的拼接方法中,待对齐的帧可以根据已定位的帧和保留范围内的帧定位。
使用这种更新的方法,软件版本4.3.1中引入的算法,现在可以获取无偏差的拼接图像,即使在包含背景的拼接区域也是如此(图2)。
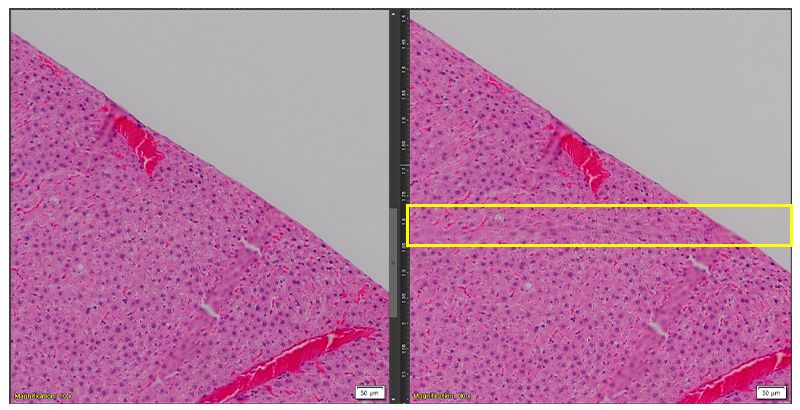
图2. 使用cellSens APEX 4.3.1版本中更新的拼接算法获取的拼接图像(左图)与未使用该算法获取的拼接图像(右图)的比较。在使用4.3.1软件版本拼接的图像中,结构似乎没有重叠。
在4.3.1软件版本中,获取拼接图像所需的时间保持不变。
校正影响拼接准确性的光学现象
放大倍率误差等光学因素会影响拼接准确性。cellSens APEX软件具有补偿这种光学现象的功能。
放大倍率校正功能
物镜会有轻微的放大倍率误差,因此纠正这个误差可以实现更准确的拼接。
使用APX100显微镜,可以通过cellSens APEX软件4.2版中引入的放大倍率校正功能,校正包括物镜在内的整个显微镜的总放大倍率。这样就可以生成高度准确的拼接图像(图3)。
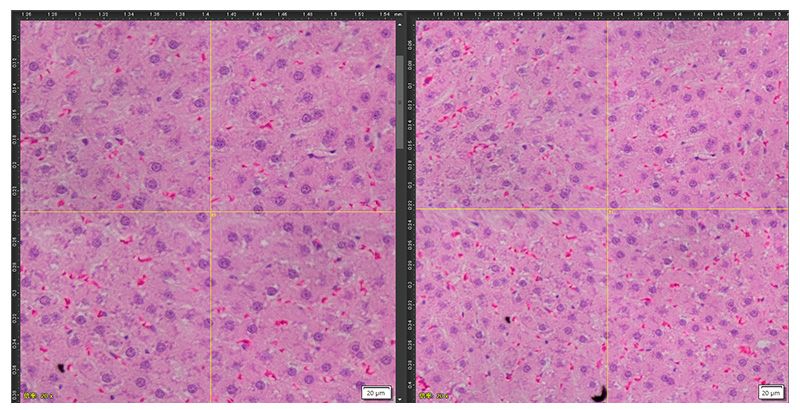
图3. 在cellSens APEX软件中启用(左图)和禁用(右图)放大倍率校正功能后所获得图像的对比。
由于每次拍摄图像时都会实时进行放大倍率校正处理,因此无论是否进行校正,获取图像的时间都不会发生变化。
2. 改善拼接图像的质量
失真等光学因素会影响拼接的图像质量。cellSens APEX软件具有补偿这种现象的功能。
失真校正功能
当图像通过系统显微镜上的物镜形成时,视场中会出现一种称为失真的现象(图4)。
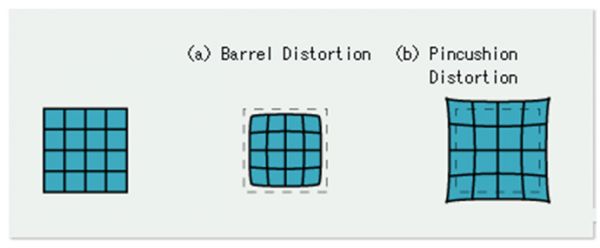
图4. 理想图像(虚线)示意图与安装了物镜后看到的图像(实线)。偏差量朝着视场边缘的方向逐渐增大。
如果在视场存在失真的情况下进行图像拼接,拼接位置的四个角上会出现两个结构。 边角结构的双重出现增加了图像质量下降的可能性。
为了避免失真并获得高质量的拼接图像,可以采用一种仅使用图像中心的方法。不过,这种方法会增加拍摄图像的数量,降低拼接量(图5)。
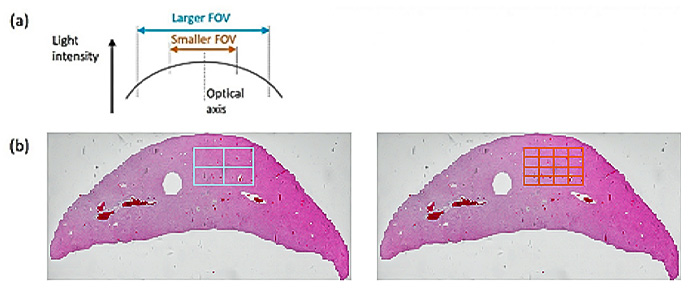
图5. 需要减小视场(FOV)以避免失真的影响(a)。拼接所需的视场数量根据视场的差异而不同(b)。
在cellSens APEX的4.3.1版本中,添加了一个补偿这种失真的功能(图6)。 这个功能使用专用校准载玻片测量每个物镜的失真量。然后,在获取拼接图像时,根据在一个视场中为每幅图像测量的失真量对失真进行校正。

图6. 启用失真校正(左图)和禁用失真校正(右图)的比较。
3. 改进了工作流程
APX100显微镜通过一系列工作流程自动执行从图像采集到图像拼接的整个过程,从而可以高效地获取拼接图像。
APX100显微镜还配备了智能样品导航器,可缩短实验工作流程。智能样品导航器可以在10秒内从捕获的宏观图像中自动探测到样品。cellSens APEX的4.2软件版本中添加了“将样品区域转换为扫描区域”功能,可让用户将探测到的样品区域设置为拼接采集区域(图7)。
这样就大大缩短了从观察前准备,到设置拼接位置,再到图像采集的工作流程。
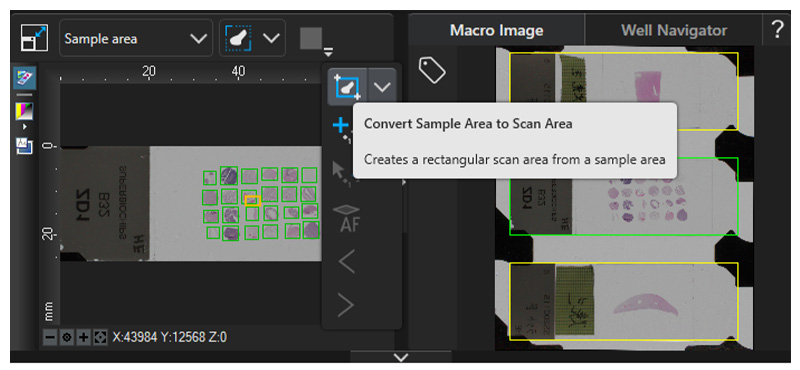
图7. 在cellSens APEX软件中,“将样品区域转换为扫描区域”功能会根据样品区域创建一个矩形扫描区域。
结论
APEXVIEW APX100桌面荧光显微镜现在可以提供增强的图像质量和拼接图像更高的准确性,并简化了从图像设置到图像捕获的实验效率。除了改进软件的拼接算法之外,我们的工程师还考虑了光学因素的校正,以达到更好的性能。
综上所述,图像拼接的增强包括以下几个方面:
- 提高了拼接区域(包括背景帧)的准确度
- 通过校正放大倍率误差,提高了准确性
- 通过校正失真,提高了图像质量
- 缩短了获取大区域、高分辨率的拼接图像工作流程
作者

Takuma Kimura
研发、软件开发,Evident
适于这类应用的产品
对不起,此内容在您的国家不适用。